YOU can always lay susify flooring yourself! These installation instructions will give you with all the important tips and tricks. And you will find out which tools you need to lay your floor. Further down you will also find easy-to-follow laying instructions. You will also find helpful pictures there that illustrate the most important techniques.
Are you ready to get started now? OK you can go straight to the useful hints: Preparation, laying susify flooring and cleaning and maintaining susify flooring.
What You need
![]() Universal knife
Universal knife
![]() Spacer
Spacer
![]() Pencil
Pencil
![]() Carpenter’s square
Carpenter’s square
![]() Tapping block
Tapping block
![]() Rubber hammer
Rubber hammer
![]() Jigsaw or an electrical saw
Jigsaw or an electrical saw
![]() Knee pads are optional
Knee pads are optional
Important laying instructions
Advice on the temperature
Ambient temperature
We recommend a temperature of 13 – 32 °C and 35 – 60% relative humidity
Acclimatisation
We recommend acclimatising the susify flooring inside the room where it will be laid for at least 24 hours (at between 13 and 32 °C).
Instructions for the surface and the subsurface
Maximum area
170 m² (13 x 13 m)
Supporting mat
Minimum 400 kPa/m² compressive strength, maximum thickness 1.5 mm (no foam)
Vapour-proof membrane
Recommended for laying in bathrooms or damp rooms.
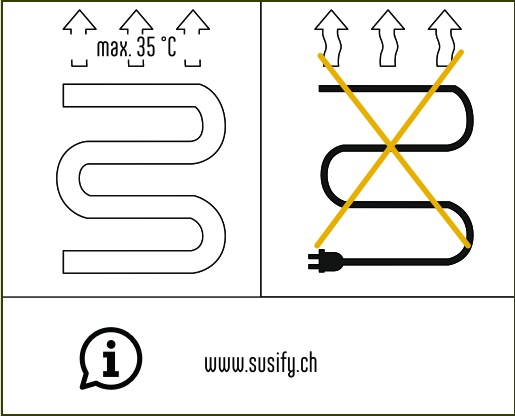
Underfloor heating
susify is designed for hot water underfloor heating systems, but not for electric heating mats. The surface temperature should not exceed a maximum temperature of 35°C.
Laying instructions
Edge clearance
At least 8 mm distance from the walls, pipes and around any heavy fixed objects, wall cupboards, kitchens, etc. up to a maximum area of 170 m². In larger rooms, additional expansion joints must be provided.
Bonding
NOT RECOMMENDED – this will void the warranty claim!
Important laying instructions
susify flooring should only be installed at room temperatures between 13° – 32° C. Make sure that the product is acclimatised for 24 hours inside of the room where it will be laid at the room temperatures indicated. Extreme heat or cold may damage the interlocking system.
Measure the length and width of your room. If the room has niches, measure these separately. This will give you with the floor area of the room. Buy at least 10 – 15 % more so you can to account for any imperfections, offcuts or replacements.
Batch uniformity/defects: Before laying, the flooring should be checked for batch uniformity, conformity with the sample material and for defects. Planks that already show visible defects before being laid should not be used.
Please note: susify is designed for indoor use only.
Do not lay the floor on existing carpets, foam underlays or inside saunas, solariums, weekend houses or conservatories where there is a wide range of temperature variation. The temperature difference (day/night) should not exceed 30° C.
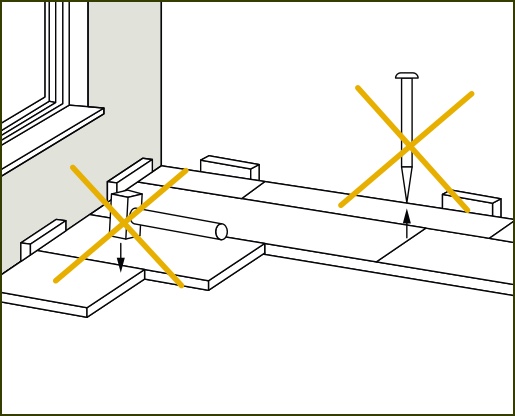
susify is a floating floor and must be able to expand and retract freely. As a result, do NOT fix it to the subfloor with screws, nails or any glue. Install washbasins, kitchen furniture and island units onto the subfloor and then install the susify around these objects.
1. Preparation

Acclimatise the panels
Store the panels at normal room humidity and temperature for 24 hours, horizontally where you want to lay your floor.

Levelling out surface unevenness
The subsurface area of the floor must be firm, clean, dry and even. You can manually level out height differences of up to 3 mm over a length of 1 m.

Remove carpet
Never lay Better Eco Flooring on carpeted floors. This type of flooring is not firm enough as a subfloor and is also unsanitary.
Floating installation
The flooring may not be secured to the subfloor under any circumstances (nails, screws). Hammering with a metal hammer may damage the click connection.

Ideal installation angle
The best way to install the panels is with the long edge parallel to direct incoming light. The temperature in the room should never exceed 35 °C.
Hot water subfloor heating
You can install your Better Eco Flooring on top of hot water underfloor heating systems without any concerns. Please do not install it on electric floor heating systems!

No more than 13 m without an expansion joint
If the floor area that needs to be connected has a length greater than 13 m, then you must provide an 8 mm wide expansion joint every 13 m.

PE film as a vapour brake
The film should be installed under the panels. It stops humidity damaging the masonry and prevents the formation of mould.

Healthy mixing of the patterns
During laying, we recommend intermixing the planks from at least 3 packages.

Avoid overloading
Better Eco Flooring is able to withstand up to 60 tonnes per square meter. If the weight of your furniture is more than this, the floor covering may be damaged. Warranty claims will become void if foam underlays are used.
2. Laying susify flooring

Only lay defect-free boards
Check the panels for damage immediately after unpacking. Defective panels should not be laid.

Longitudinal end pieces
Please measure the room before laying the flooring. The longitudinal end pieces must be at least 5 cm wide.

No springs at the edge
Install on the wall or around the object panels with the nut on the wall side or on the surface side of the object. Just cut this if necessary.

Inclined wall
Draw the shape of your wall onto the panels with a pencil and a scrap piece of paper. Cut the panels to fit exactly along the line you have drawn.

At the correct angle
Insert the spring of the panel that needs to be laid at an angle of 10 to 15 degrees into the nut of a panel that has already been laid.

Follow the sequence
1: Click the spring into the nut. 2: Press the short sides together. 3 and 4: Push panel down. 5: Use a rubber mallet to push the panel down.

Check the edges
Check the edges and the corners to make sure that the panels that have been laid are properly connected to each another.

Minimum offset of 20 cm
The short edges (head joints) must always be offset by a minimum of 20 cm from row to row.

Trim the end pieces
Make a cutting mark with the guide angle at the chosen position. Table saw: Decorative side up. Jigsaw: bottom side up.

Check the click connection
Check that the connection is clicked in properly

Sawn-off end pieces
You can use the end piece that was sawn off in the last row as the first panel in the new row if it is at least 20 cm long.

Do not install underneath any objects
First place your furniture in the room and then lay your Better Eco Flooring around the objects – not underneath them.

Cut-outs for pipes
Diameter: 5 to 10 mm larger than the pipe. Mark, drill holes, saw out part at an angle (illustration) and attach.
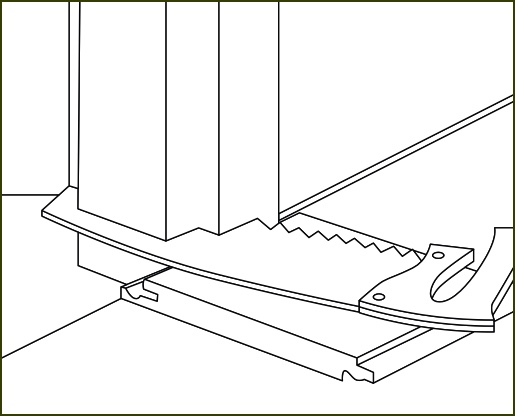
Reducing the length of the frames (door frames)
Place a leftover piece on the frame with the decor facing downwards. By doing this, you can reduce the height of the frame to match the height of the panels.

Removing spacers
You only need edge spacers during the laying process. Remove these as soon as your Better Eco Flooring has been completed.

Distance around objects
Make sure that your Better Eco Flooring is 8 to 10 mm away from any walls or pillars in the room.

Installation pattern
You can fit your Better Eco Flooring in a regular pattern (shown in the picture above on the left) or an irregular pattern (shown in the picture above on the right).
3. Cleaning and maintaining susify flooring
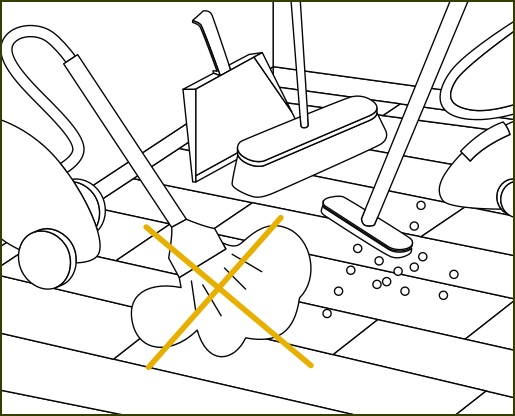
Cleaning the Better Eco Flooring
susify floor coverings are very low maintenance: vacuuming, damp mopping or sweeping with a broom is sufficient. Please do not use a wet vacuum cleaner.

Recommended cleaning agents
Feel free to add some all-purpose cleaner to your water as you mop the floor. Please do not use any alkaline cleaning agents.

Fitting dirt-trapping mats
Better Eco Flooring is able to withstand almost anything. Even so, you should protect your floor covering from dirt particles and scratches.

Felt for the feet
Make sure that you always place pieces of felt on the feet of chairs, tables and under pieces of other furniture. This will protect the floor covering from scratches.

Soft castors and protective mats
Office chairs should have castors with soft treads or soft castors. Protective mats are helpful in high-traffic areas.

Ideal room temperature
Your Better Eco Flooring feels most comfortable at a temperature of 20 °C and at a room humidity level of between 35 and 60 per cent.